Printable Instant Pot Cooking Times Chart – Food preparation is both an art and a science, and recognizing the ideal food preparation times can make all the distinction between a delicious meal and a culinary calamity. Whether you’re a seasoned cook or a home cook, having a trustworthy cooking time chart at hand is crucial. In this post, we’ll dive deep into the globe of cooking times, breaking down whatever you need to know to guarantee your dishes turn out perfectly whenever. Printable Instant Pot Cooking Times Chart.
Importance of Understanding Cooking Times
Food preparation times are crucial for making sure that your food is prepared thoroughly and securely. Correct cooking not only boosts the flavor and structure of your dishes however also aids stop foodborne illnesses. Overcooking or undercooking can considerably impact the quality of your dish, making understanding cooking times a vital ability in the cooking area.
Just How Food Preparation Times Affect Food Quality
Cooking times can impact greater than simply safety and security; they additionally affect taste and appearance. As an example, overcooked meat can come to be challenging and dry, while undercooked poultry can be dangerous to consume. A cooking time graph helps you strike the right balance, ensuring your dishes are both safe and scrumptious.

Understanding Cooking Times
What are Cooking Times?
Cooking times refer to the period needed to prepare food to the preferred doneness degree. These times can differ based on the sort of food, its size, and the food preparation technique utilized. A well-structured food preparation time chart supplies a fast reference for these times, making meal preparation more effective.
Aspects Impacting Cooking Times
Several aspects can influence cooking times, consisting of:
- Dimension and Thickness: Larger or thicker pieces of food generally need more time to cook.
- Food Preparation Approach: Different approaches (e.g., cooking, barbecuing) can impact just how swiftly food chefs.
- Temperature level: Cooking at higher or reduced temperatures will alter cooking times.
- Elevation: Food preparation times can be longer at greater altitudes because of reduced atmospheric pressure.
Food Preparation Time Graph Fundamentals
Sorts Of Food Preparation Time Charts
Cooking time graphes can be classified into several types:
- General Charts: Offer typical cooking times for different foods.
- Specialized Charts: Focus on particular groups like meats or vegetables.
- Method-Specific Charts: Detail times based upon food preparation approaches like cooking or barbecuing.
How to Utilize a Food Preparation Time Chart
Utilizing a cooking time graph is easy. Find the type of food and its prep work method, after that describe the recommended time. Change based on your details problems, such as oven type or food dimension.

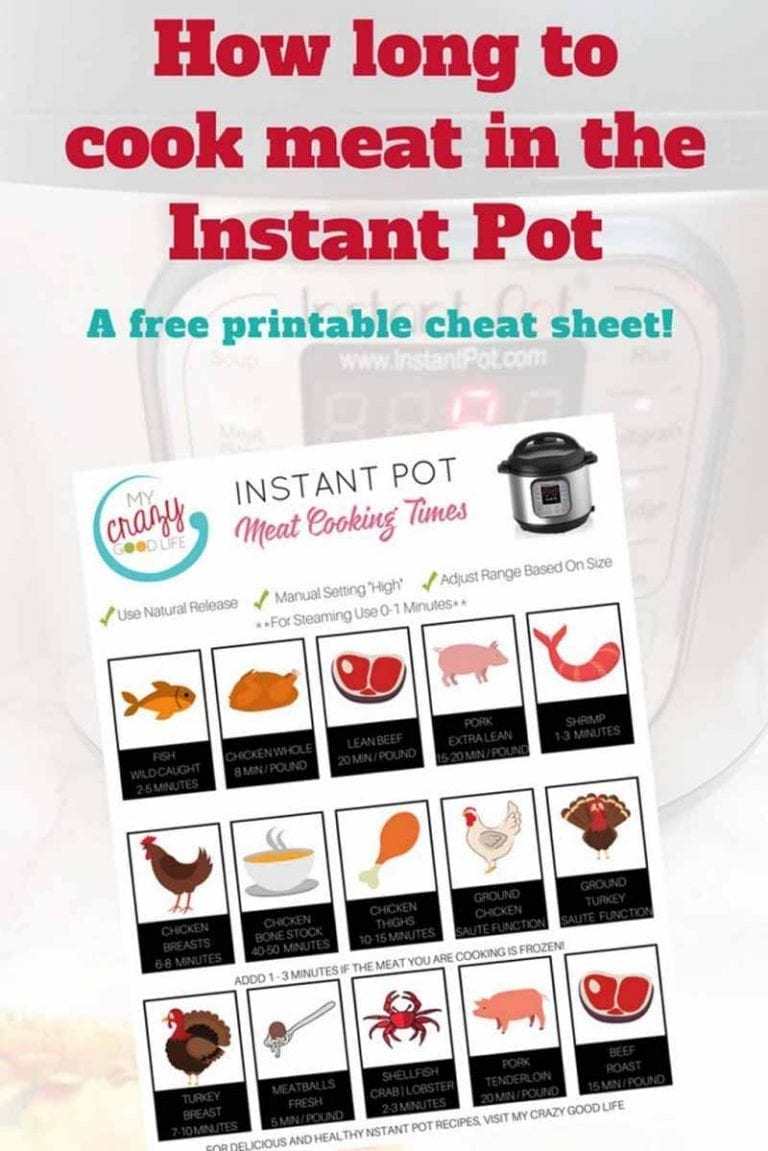
Meat Food Preparation Times
Beef
- Roasts: For a medium-rare roast, chef at 325 ° F( 163 ° C) for about 20 mins per extra pound.
- Steaks: Grill or pan-fry for concerning 4-5 minutes per side for medium-rare.
Pork
- Roasts: Prepare at 325 ° F( 163 ° C) for 25 minutes per pound.
- Chops: Grill or pan-fry for 6-8 minutes per side, depending upon thickness.
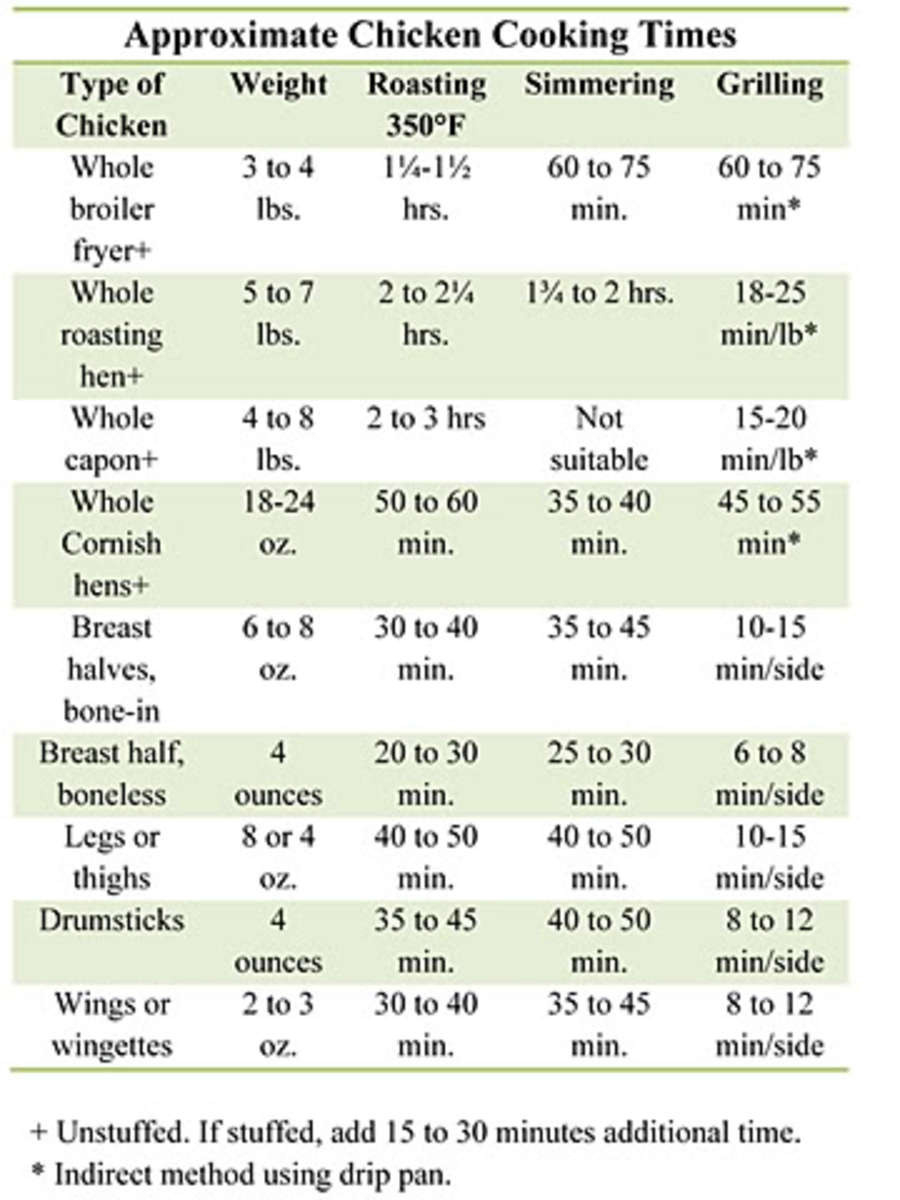
Poultry
- Whole Chicken: Roast at 350 ° F( 177 ° C )for around 20 mins per extra pound.
- Poultry Breasts: Bake at 375 ° F( 190 ° C) for 25-30 mins.
Lamb
- Roasts: Cook at 325 ° F( 163 ° C )for about 25 mins per pound for medium-rare.
- Chops: Grill or pan-fry for 4-5 minutes per side.
Seafood Food Preparation Times
Fish
- Entire Fish: Cook at 400 ° F( 204 ° C) for 20 minutes per
- pound. Fillets: Cook at 375 ° F( 190 ° C )for 15-20 mins.
Shellfish
- Shrimp: Boil or sauté for 3-4 mins till pink and opaque.
- Lobster: Steam for regarding 7-10 mins per pound.
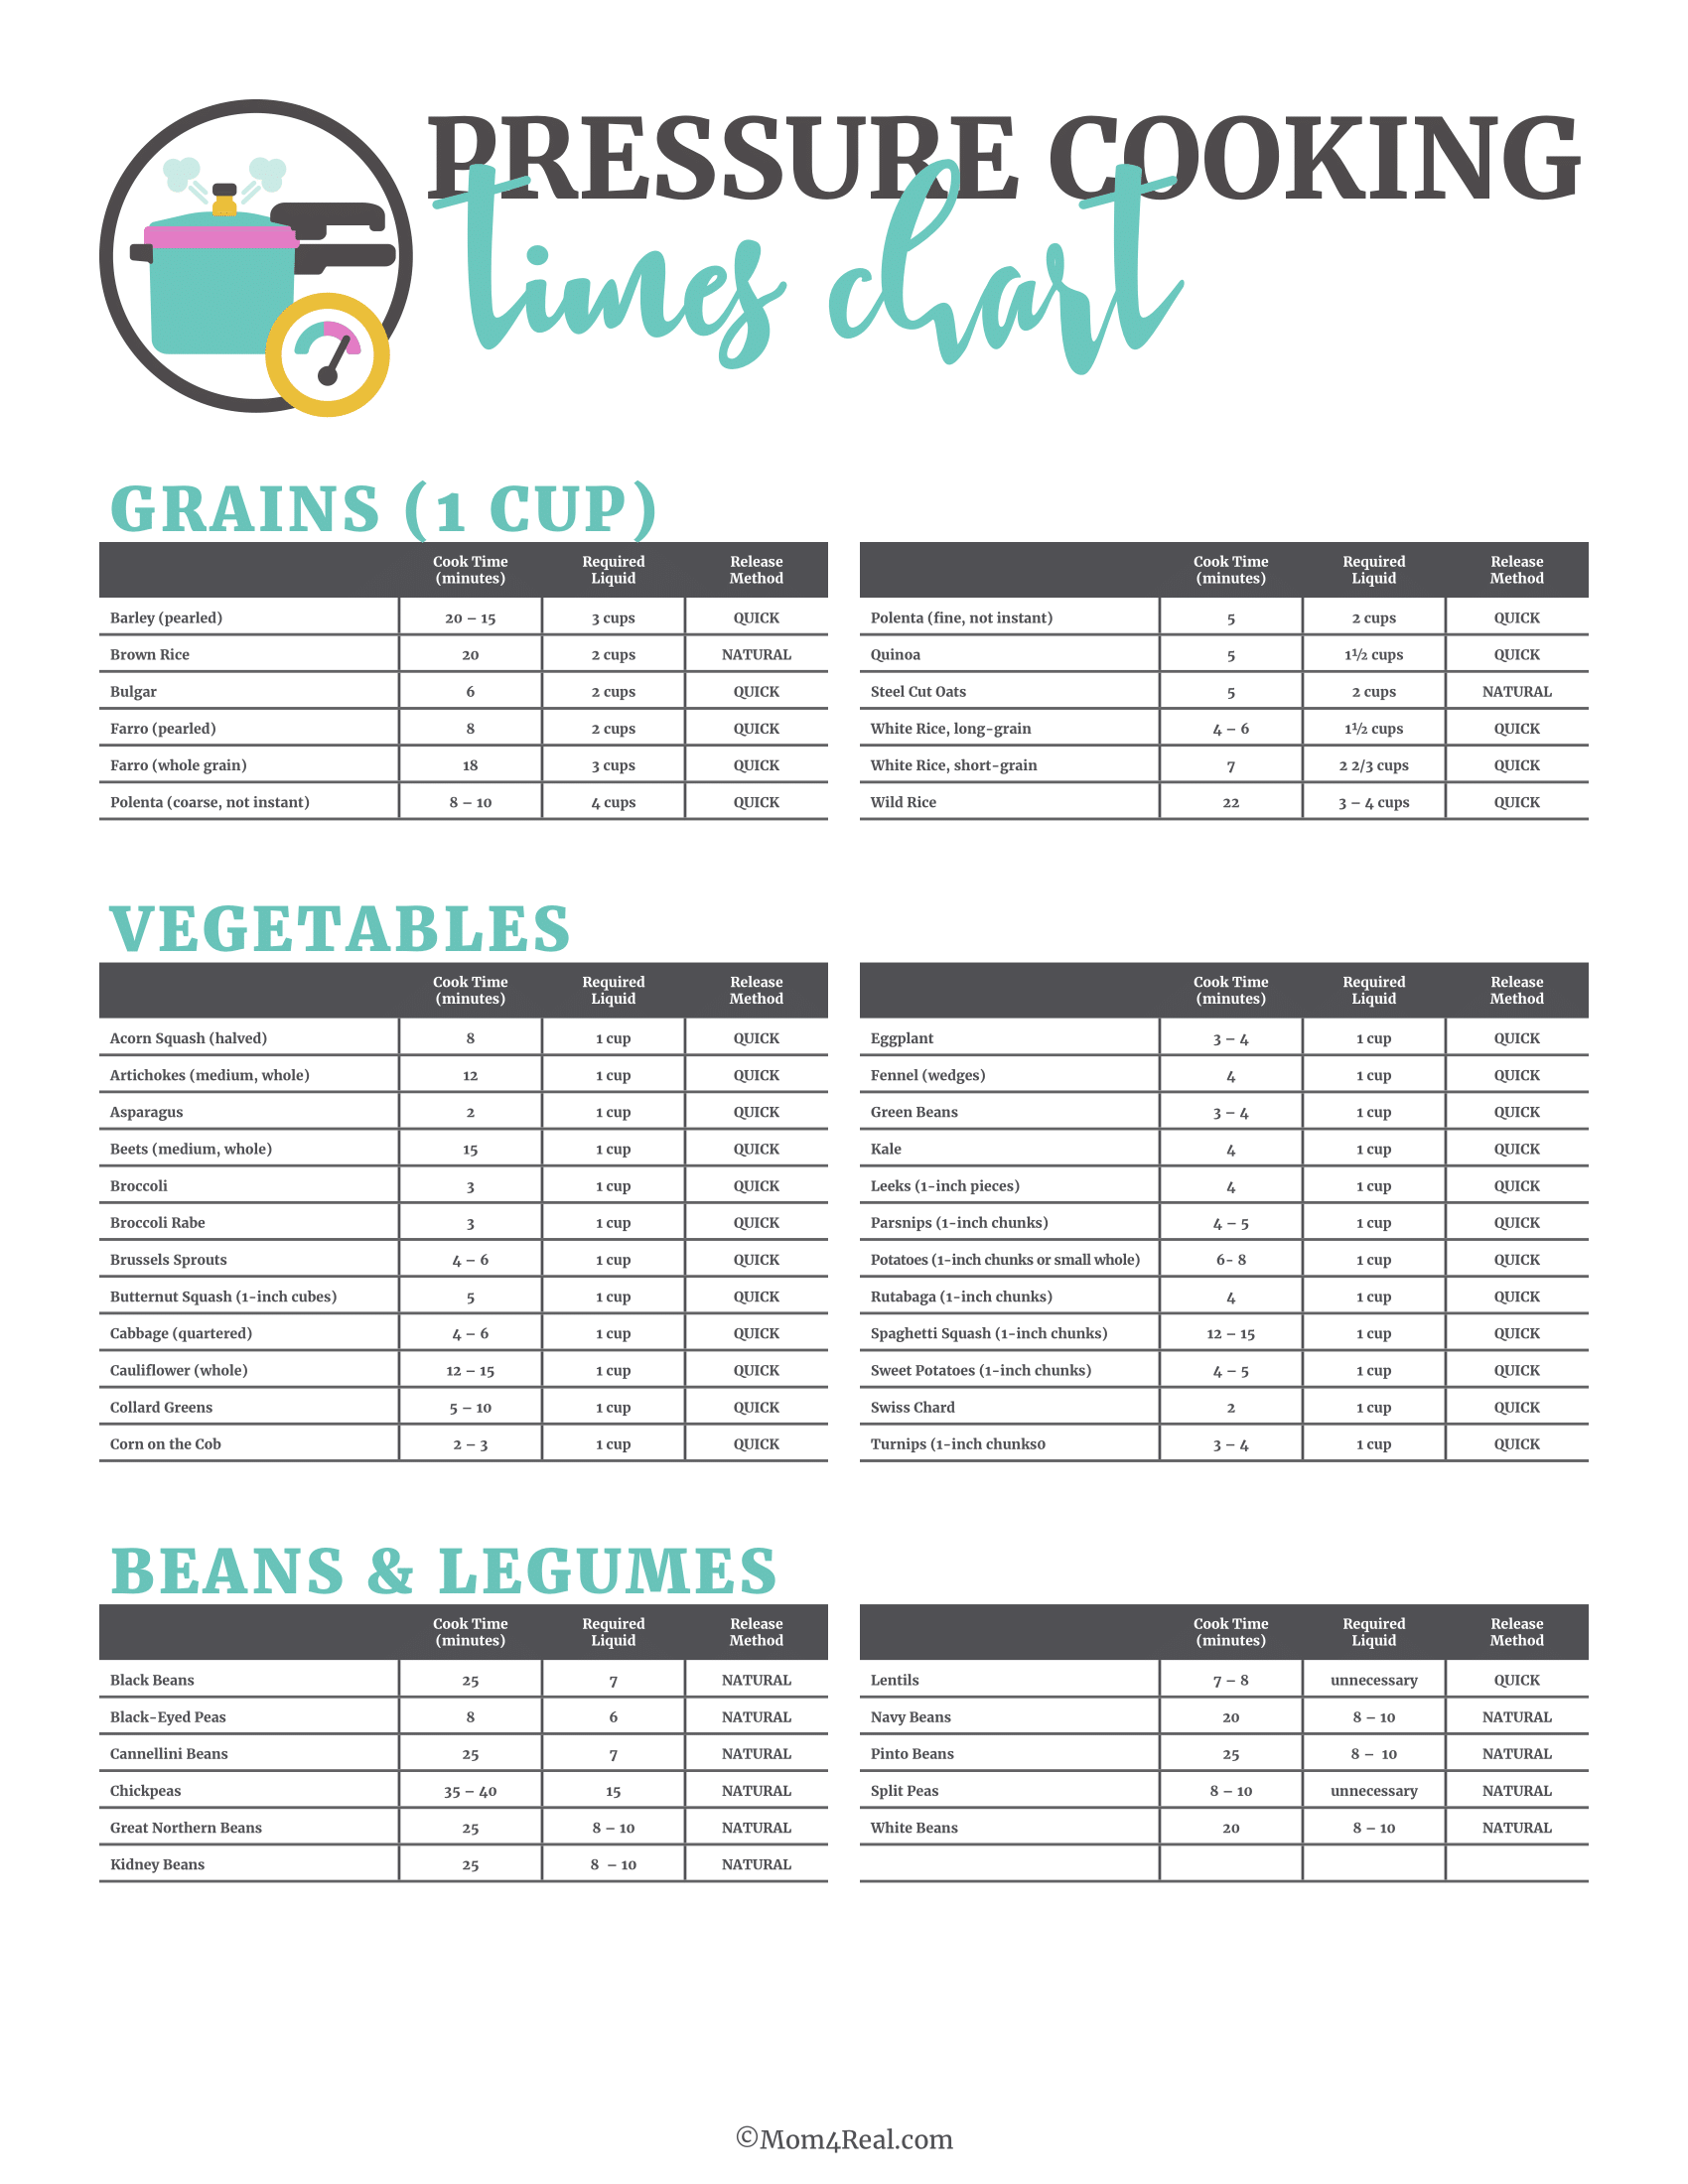
Vegetable Cooking Times
RootVegetables
- Potatoes: Bake at 400 ° F( 204 ° C )for 45-60 mins, relying on size.
- Carrots: Boil for 5-7 minutes or roast for 25-30 minutes.
Leafy Greens
- Spinach: Sauté for 2-3 minutes until wilted.
- Kale: Sauté or cook for 10-15 mins.
Cruciferous Veggies
- Broccoli: Heavy steam for 5-7 mins.
- Cauliflower: Roast at 425 ° F( 218 ° C )for 20-25 mins.
Cooking Times for Various Methods
- Cooking: Baking times differ based on the recipe. Cakes, covered dishes, and bread each have special times and temperatures.
- Boiling: Boiling times rely on the food. For pasta, it’s usually 8-12 minutes; for eggs, regarding 10 minutes for hard-boiled.
- Steaming: Steaming keeps nutrients better. Veggies normally take 5-10 minutes, depending upon size.
- Sautéing: Sautéing is quick, commonly taking 5-10 mins for veggies and 3-4 minutes for proteins.
- Cooking: Grilling times vary widely. For meats, it can vary from 4 minutes per side for thin cuts to 20 minutes per side for thicker pieces.
Special Considerations
Altitude and Food Preparation Times
1. Recognizing Altitude Impacts
At higher altitudes, the reduced air pressure can influence cooking times and temperature levels. For instance, water boils at a lower temperature, which indicates that food preparation processes could need more time to finish. Readjusting your dishes for elevation can make certain far better results.
2. Changing Food Preparation Times
- Approximately 3,000 Feet: Slight adjustments are usually adequate. Increase cooking time by concerning 5-10% or include a few additional mins.
- 3,000 to 6,000 Feet: Moderate adjustments may be required. Rise cooking time by 10-20%, and occasionally boost the temperature level by 25 ° F to make sure appropriate food preparation.
- Over 6,000 Feet: Substantial changes are required. Increase cooking time by 20-30% and readjust temperature settings as required. For baking, you could also need to adjust the quantity of fluid and leavening representatives.
3. Cooking at High Altitudes
Baking can be specifically challenging. For cakes and cookies:
- Lower Baking Powder/Soda: Way too much can create rapid climbing and collapse.
- Boost Flour: To make up for the lower density of air.
- Increase Liquid: To counteract the quicker dissipation rates.
Oven Variations
1. Stove Temperature Precision
Not all stoves warm uniformly. A conventional oven might have temperature variations of as much as 50 ° F. This inconsistency can impact food preparation and baking outcomes.
2. Testing Oven Temperature
To ensure your oven goes to the appropriate temperature level:
- Use an Stove Thermostat: Position it in the center of the stove and contrast the reading to your oven’s temperature level setup.
- Regular Calibration: Calibrate your oven regularly to keep precision.
3. Keeping Track Of Food Preparation Times
- Check Early: Start checking your food a few mins prior to the advised cooking time to prevent overcooking.
- Readjusting Dishes: If you discover your stove cooks faster or slower, adjust your recipes appropriately by either decreasing or enhancing cooking times.
4. Convection Ovens
Convection ovens flow air, which can cause faster and extra even cooking. Generally, decrease cooking time by concerning 25% or reduced the temperature level by 25 ° F contrasted to traditional ovens.

Tips for Accurate Cooking Times
Utilizing a Meat Thermometer
1. Importance of a Meat Thermometer
A meat thermostat is an vital tool for guaranteeing that meats get to the proper inner temperature. This protects against undercooking and overcooking, guaranteeing food safety and security and desired doneness.
2. Kinds Of Meat Thermometers
- Dial Thermostats: Feature a steel probe with a dial for reading temperature levels. Place the probe into the thickest part of the meat.
- Digital Thermometers: Supply quick and precise analyses with a electronic screen. Ideal for exact temperature measurement.
- Instant-Read Thermometers: Deal quick results, normally within a few secs. Perfect for inspecting temperature during food preparation.
3. Exactly how to Use a Meat Thermometer
- Insert Properly: Put the thermostat right into the thickest part of the meat, avoiding bones and fat.
- Inspect Temperature: Make sure the meat gets to the recommended inner temperature level for security and quality.
- Clean After Usage: Laundry the probe with hot, soapy water before and after use to stop cross-contamination.
4. Suggested Inner Temperatures
- Fowl: 165 ° F( 74 ° C).
- Beef, Pork, Lamb: 145 ° F( 63 ° C).
- Ground Meats: 160 ° F (71 ° C).
- Fish: 145 ° F (63 ° C).
Checking Doneness.
1. Visual Hints
- Meat Shade: For lots of meats, a adjustment in color shows doneness. For example, chicken must no more be pink, and beef should have a clear, reddish-pink shade for medium-rare.
- Juices: Clear juices typically symbolize that meat is prepared through, while pink or red juices could indicate that additional food preparation is needed.
2. Responsive Signs.
- Structure: Suppleness can be a excellent sign of doneness. As an example, a well-done steak will really feel firm, whereas a rare steak will really feel soft.
- Touch Test: Contrast the firmness of the meat to the firmness of the hand of your hand for a rough scale of doneness.
3. Cooking Times and Doneness.
- Comply With Recipes: Recipes offer cooking times based on certain temperature levels and meat cuts. Readjust these times based upon your certain oven or altitude.
- Resting Time: Permit meats to rest after cooking. This helps rearrange juices and can affect final structure and temperature level. Resting times can differ but typically variety from 5 to 15 minutes depending upon the size and sort of meat.
4. Oven Monitoring.
- Use a Timer: Set a timer based upon the advised food preparation time. Examine your food periodically as ovens differ.
- Adjust as Needed: If using a stove or cooking at high altitudes, remember to readjust the cooking time and temperature level as required.
Typical Errors and How to Prevent Them.
- Overcooking: To stay clear of overcooking, check your food carefully and utilize timers. Remember that some foods remain to cook after being removed from warmth.
- Undercooking: Undercooking can be avoided by adhering to recommended times and checking doneness with a thermometer or other methods.
Adjusting Food Preparation Times for Recipes.
- Customizing Times for Various Sizes: Adjust cooking times based upon the dimension of your food. Larger pieces take longer, while smaller sized items cook quicker.
- Adapting for Personal Preferences: Personal preference can affect cooking times. For instance, if you favor well-done meat, cook a bit longer than the standard time.
Verdict.
Knowing how to make use of a cooking time graph is a valuable skill in the cooking area. It assists ensure that your meals are prepared to excellence, balancing safety with flavor and texture. By comprehending the essentials of cooking times and how they vary by food type and method, you can improve your cooking efficiency and avoid typical mistakes. Remember, food preparation is as much concerning experience as it is about standards, so make use of these charts as a starting factor and adjust as required to fit your choices and cooking area conditions.
Frequently Asked Questions.
- Exactly how do I adjust cooking times for frozen foods?
- Frozen foods typically require additional cooking time. Examine the package directions for particular suggestions.
- What’s the best means to make sure also cooking?
- Ensure also cooking by utilizing uniform dimensions for your food and turning or stirring it as needed.
- Can I use the same food preparation time graph for all ovens?
- While graphes supply general guidelines, specific oven performance can differ. Use an oven thermometer for ideal results.
- How do I transform cooking times for various food preparation techniques?
- Various approaches can affect cooking times. As an example, cooking may need even more time than steaming. Use specific graphes for each and every approach or readjust based upon experience.
- What should I do if I don’t have a cooking time chart?
- In the lack of a graph, describe recipe standards, and readjust based upon the size and type of food. Use a thermometer to make sure proper doneness.